
Lithium 3D Maglite upgrade
Because rechargeable NiMH "D" Cells are for the weak.

Disclaimer...
The activities described in this article involve the use of tools, soldering equipment, and manual labour, all of which carry inherent risks, including but not limited to burns, electric shock, explosion of lithium cells, injury, loss of eyesight, or property damage. Always follow proper safety precautions, use protective gear, and ensure you have the necessary skills before attempting similar tasks.
I am sharing my personal experience for informational purposes only. If you choose to follow any of the steps or use any of the tools mentioned, you do so at your own risk. I am not responsible for any injuries, damages, or other consequences resulting from your actions. If you're unsure about any aspect of the work, seek professional advice. Stay safe!
In case you are asking. I designed the 3D printed files myself had it professionally printed over at 3D-Schmiede, bought the BMS and Changer off ebay with my own money and did the soldering and fabricobbling myself.
And no, if you click on any of the links that take you to the product page and buy their product I will not be getting any cent and this website makes use of 0 (Zero) cookies, the only way for me to know you were here is for you to contact me down here.
I just hate buying batteries and I have 5 18650s lying around....
So, basically if you are on the same situation as I was. You have a Maglite with "D" cells (in my case the 3D model) and are thinking about upgrading it, not necessarily just by putting an LED on it, but by also making it rechargeable, well... you have a couple of Options:
You are a "Normal" person and you think straight: You would just go to a store and buy some rechargeable "D" Cells and a suitable charger! Voilà now you can also throw in the official Maglite LED upgrade! Congratulations you now have a way better flashlight! Some 1.2V Cells give you 10000mAh of capacity if you trust the numbers!! That will surely keep your incandescent Maglite running for at least 10 Hours and will only set you back around 30 bucks!
You are a cool kid and manage to find 3 Lithium 32600 cells and replace the D cell in your Maglite. No Safety added!!
You are somewhat like me, and just thought "Why make it the easy way if we can add a little challenge?" Then please keep reading as this article might just be the kind of entertaining Idea you are looking for!
Requirements:
Lithium loves a blast and it is pretty fiery, therefore I want to have a controlled charger, a under-voltage protection AND short circuit protection.
After searching the ebay jungle I was unable to find what I wanted in one single package, therefore I decided on buying these two:
USB-C 2S charger:
2S BMS:
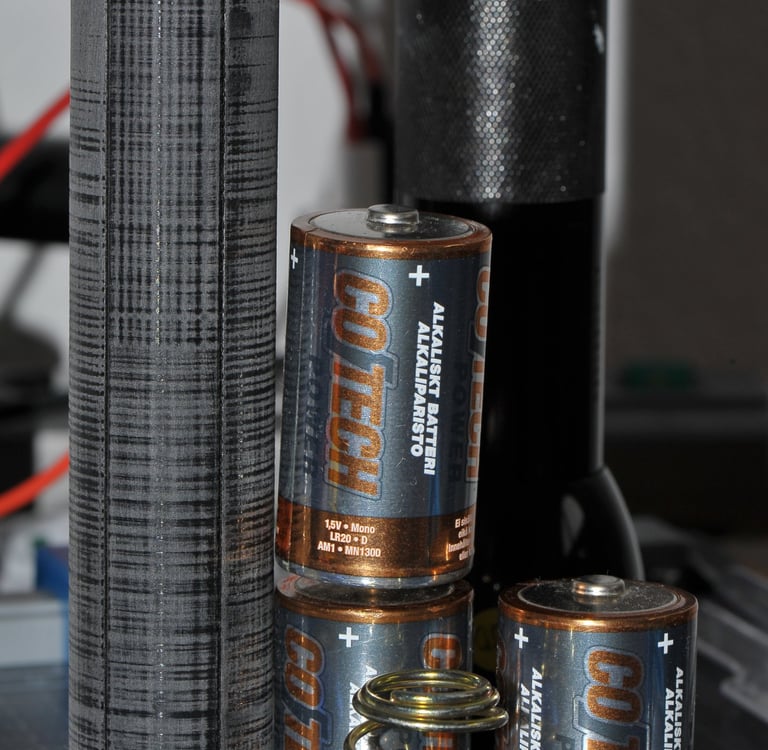
Unfortunately the 3D Maglite only fits 2 18650 Cells. If you are doing this project from scratch I would not recommend using 18650s unless you have them, like me, just lying around. You could go for two 32650s instead, they seem easy to find, or you just help yourself on wikipedia and find a suitable battery https://en.wikipedia.org/wiki/List_of_battery_sizes
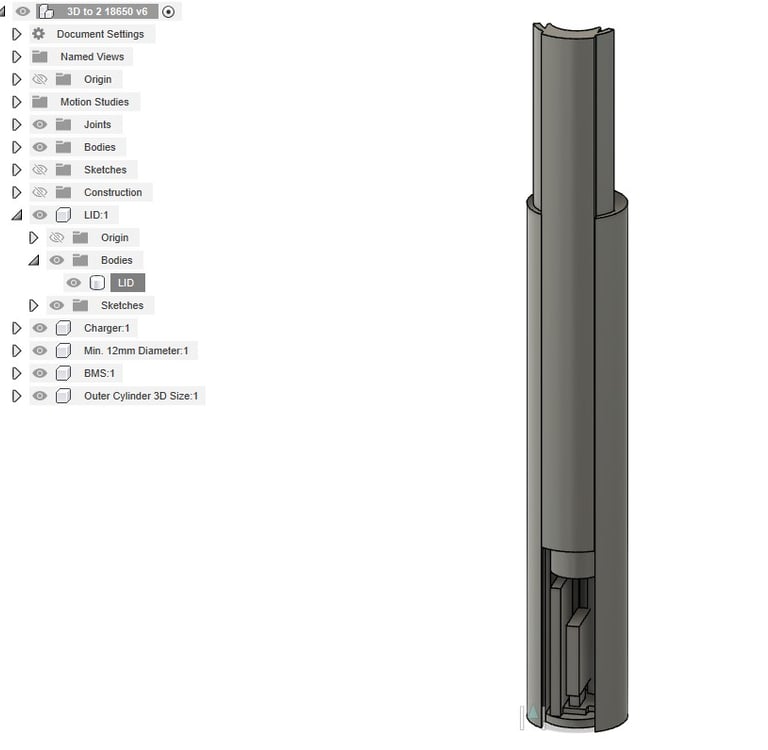
The modelling
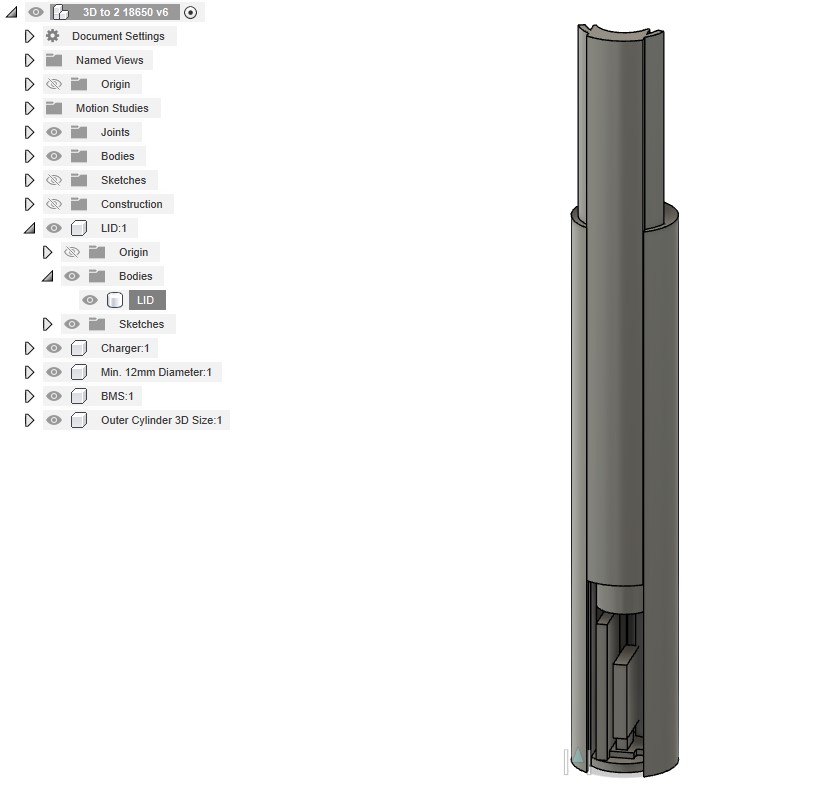
Fusion is a cool tool! I had previous AutoCAD experience, but never worked with Fusion before. It takes some some time understanding what the program has to offer and what tools and methods can be employed, but after watching some youtube videos and trying things out I am now able to do some basic modelling, enough to make my cylinder with a lid and space for electronics and two Cells.
One tip for using Fusion: Label your sketches and bodies and try to have a system, that way you will be able to change things if you realize something is off later, also make sure to use that timeline at the bottom of your screen!
Once my printed parts came from 3D-Schmiede, It was now only a matter of making sure it all fits nice an tight inside the Maglite. My initial Idea was that I wanted the Tube to fit in the maglite snugger than the D-Cells, just because I wanted to avoid any issues with the contacts moving and the lights going dimmer, like in some flashlights that you have to bang a couple times for the lights to come back on again. But I also wanted the tube to come out of the torch with the aid of gravity and maybe a bit centrifugal force at the most, so that eventual repairs could be performed.

Contact me if you want to have the files for printing your own adapter. I would appreciate a kind donation too, it shows my work is worth something to you.
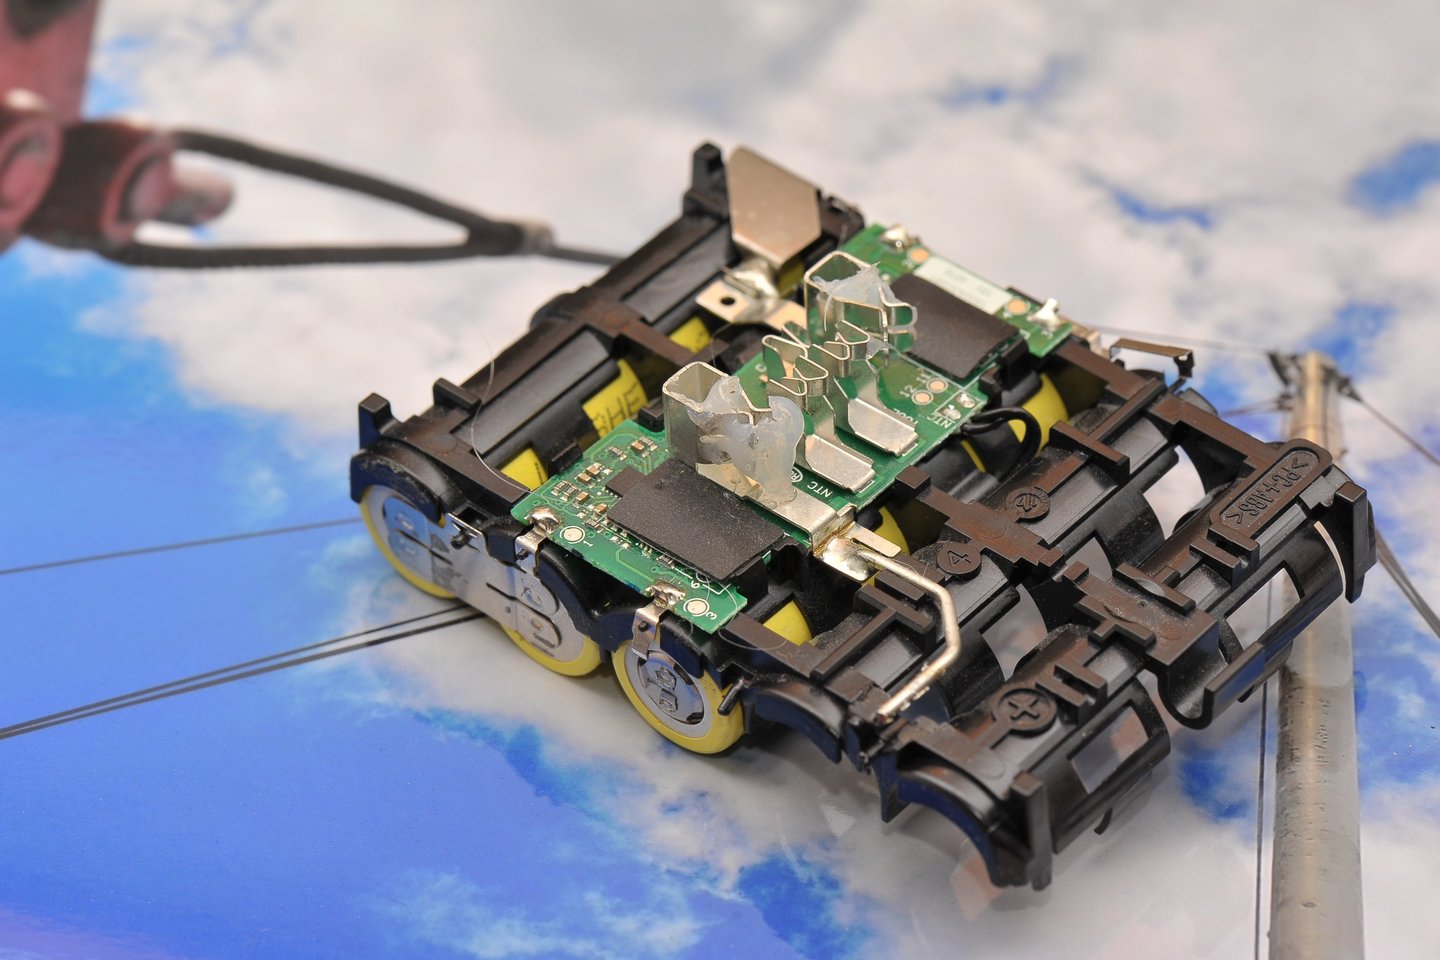
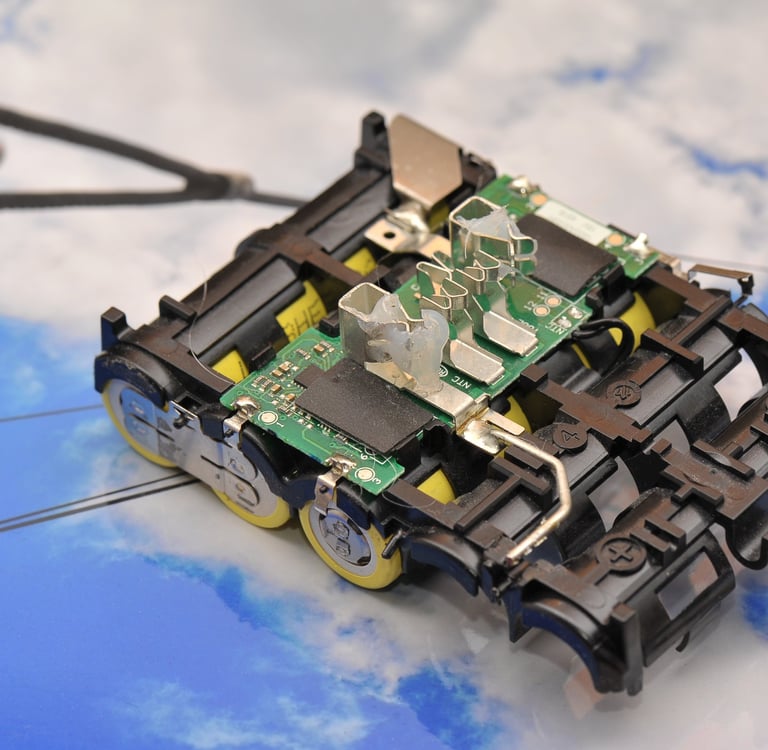
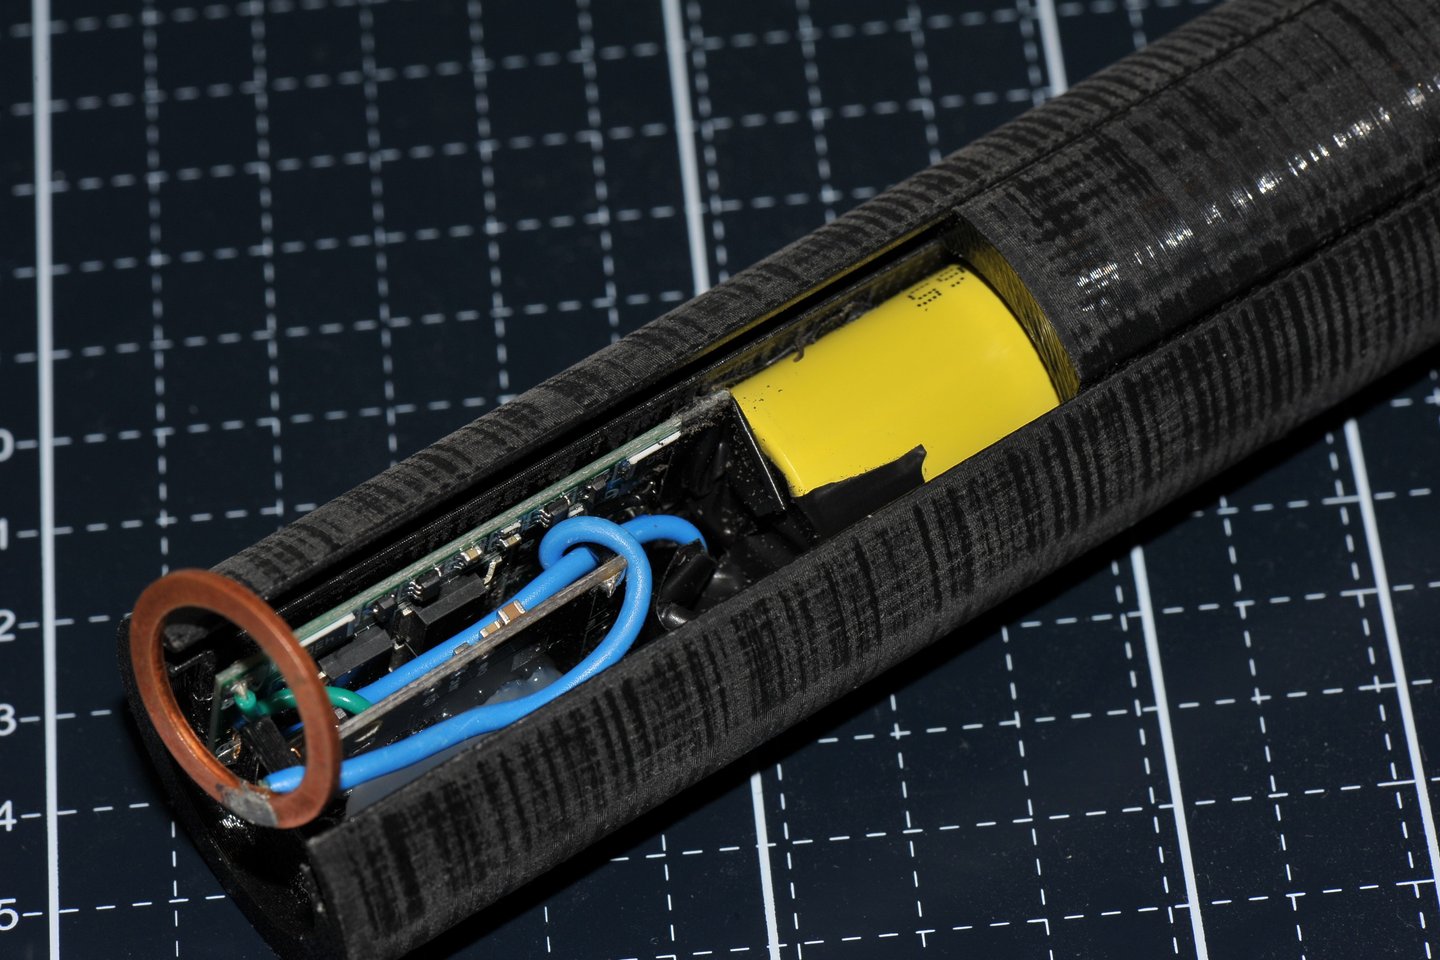
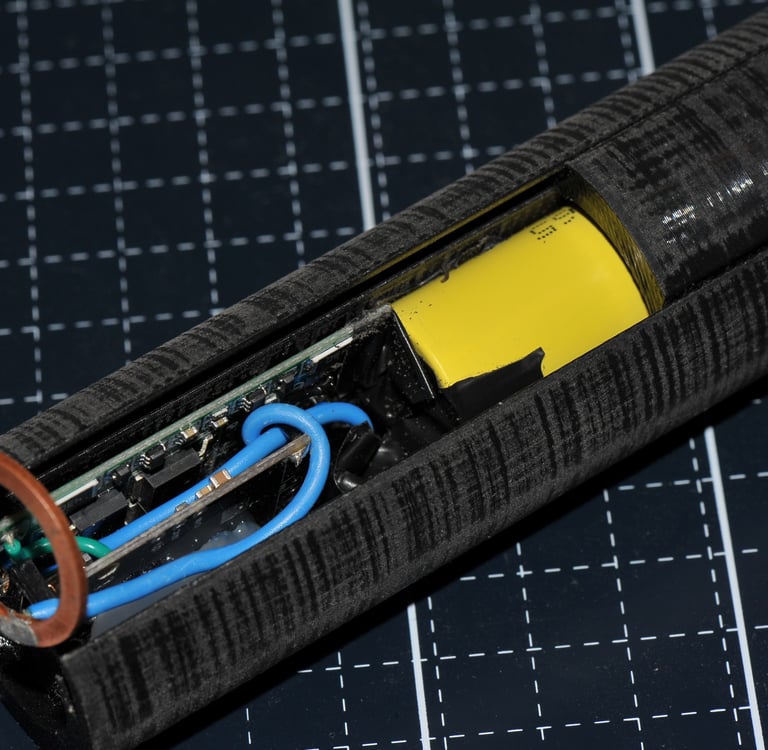
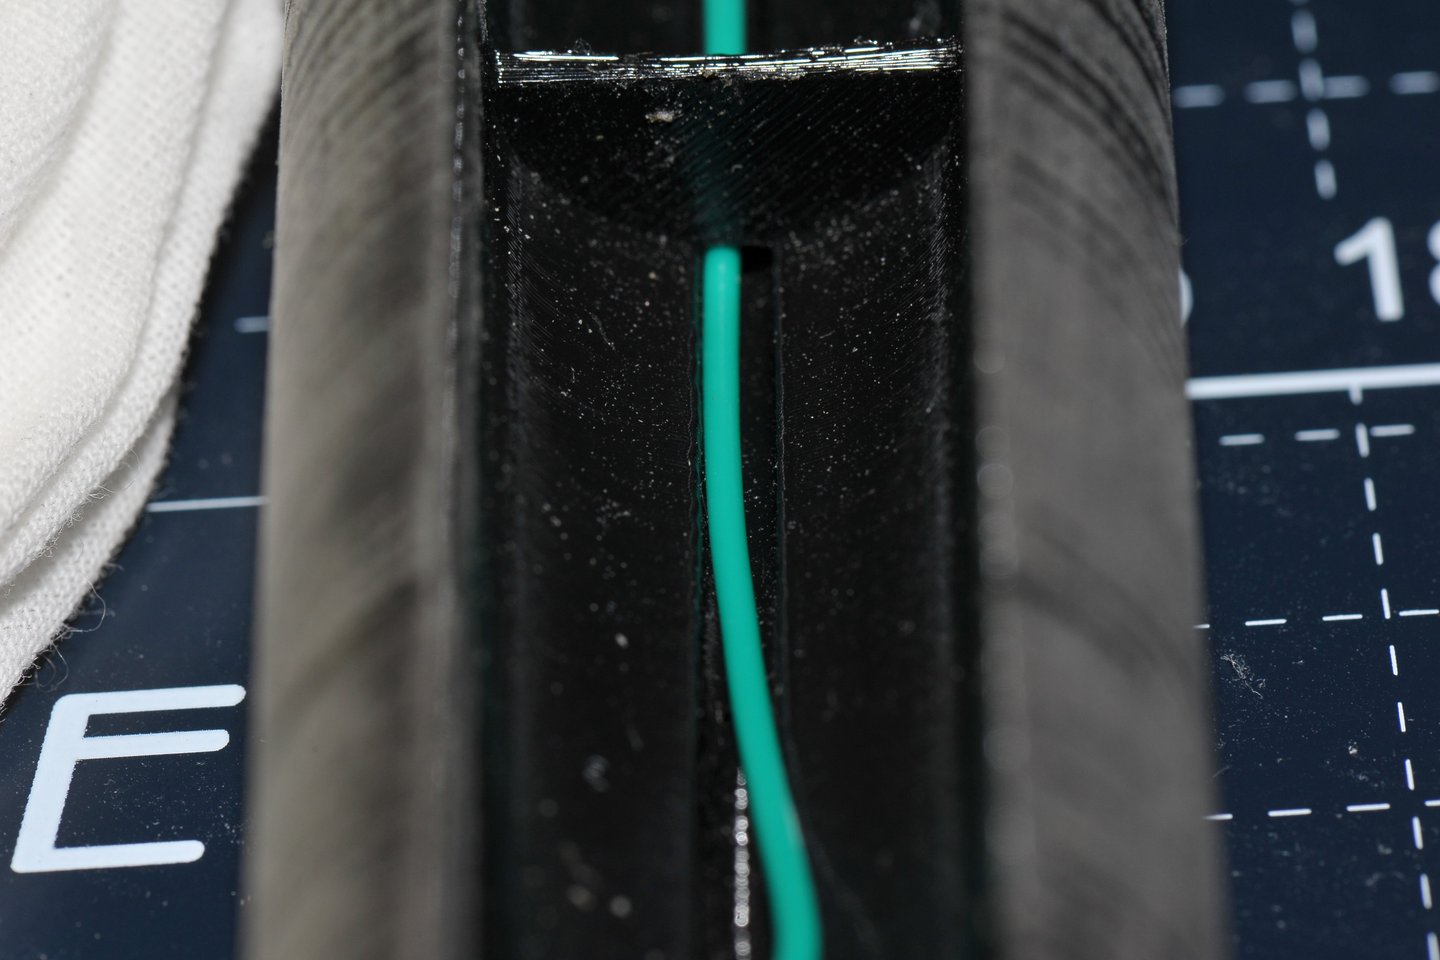
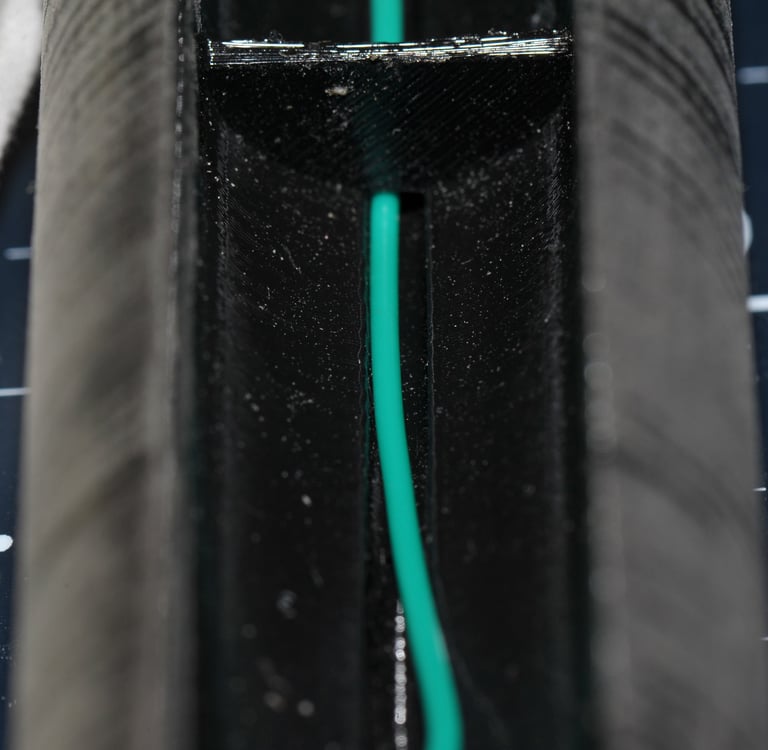
A little bit of cable management was also designed and a clear stop between both 18650s, so that the top battery does not push on the bottom one whilst keeping good contact with the flashlight's positive pole.
Safety Third!
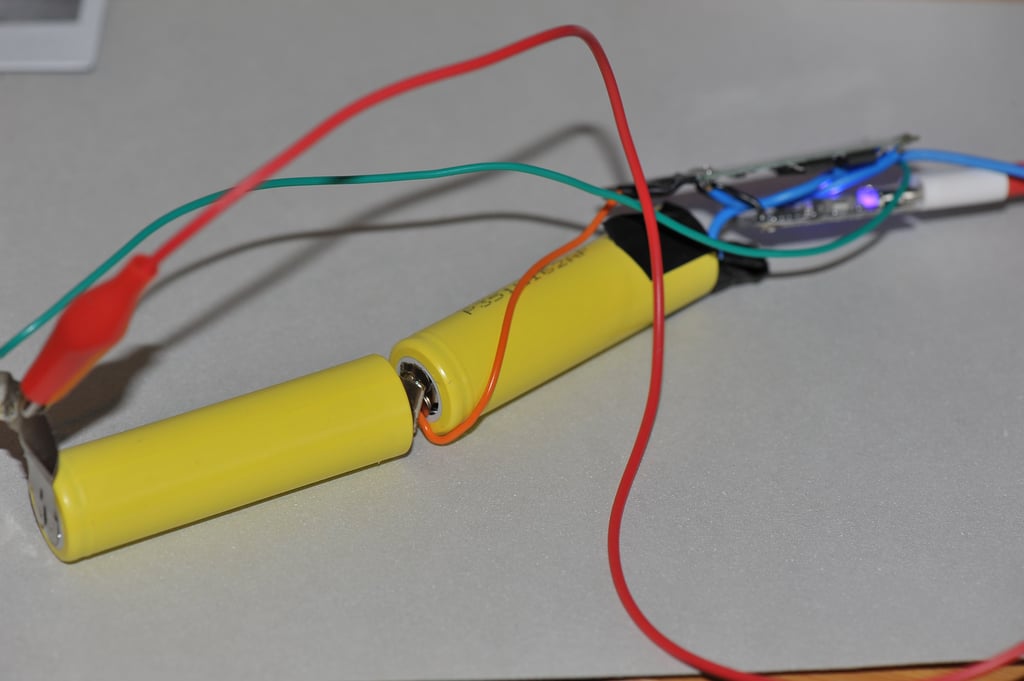
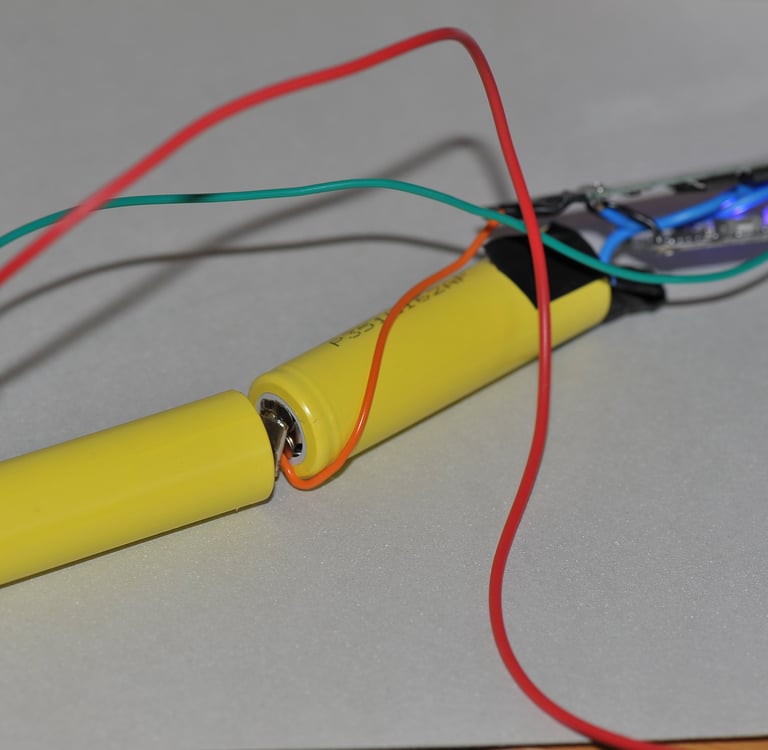
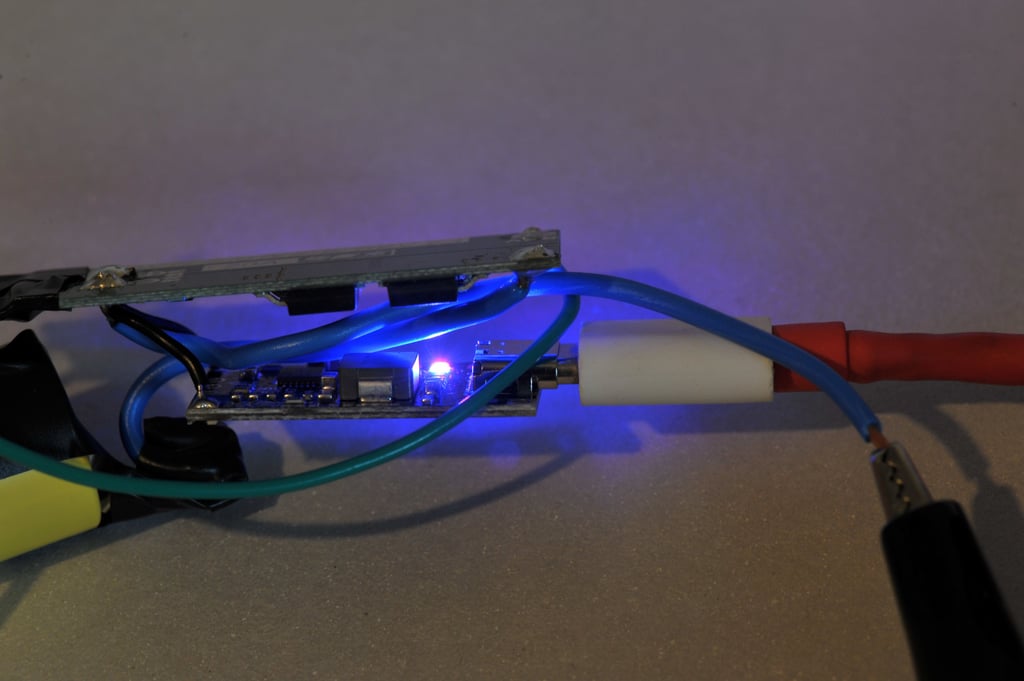
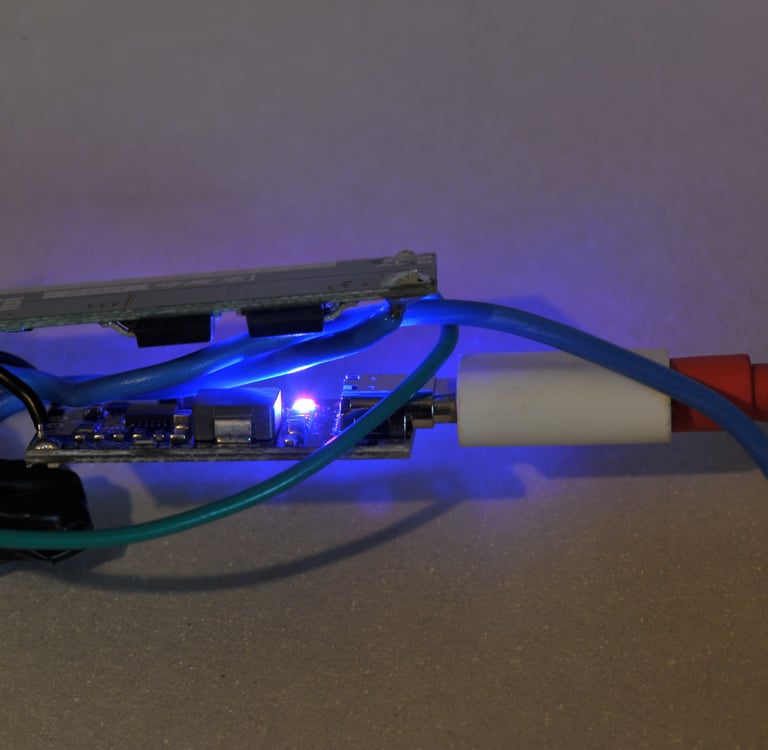
All the wiring and how to connect the battery to the BMS and Charger are pretty straight forward, they are also depicted in the ebay article. The one thing I did was to Connect the BMS to the two Batteries (0V to 4.2V is battery 1, and 8.4V is battery two), then, the Charger I connected ONLY to the BMS + and -. Therefore the Changer provides up-to max charging voltage of 8.4V and the BMS is responsible for fiddling with both batteries's states of charge, ensuring they are charged to the same level.
I also tested the BMS's discharge cutoff voltage which is around 5.80V, we are safe there.
Charge cut-off voltage is 8.39-8.40V, tested, we are safe there too.
Test, Test, Test!
So many times in my life I put things together without testing them, sure they would just work as intended. Yep, not this time. This time I have tested it before putting it all into the case. Believe me, this attitude saves you a lot of time in the long run! But, disappointingly in this case, everything worked first time! I am sure that, if I had not tested it it would most likely not worked, that just how lucky I am. :)
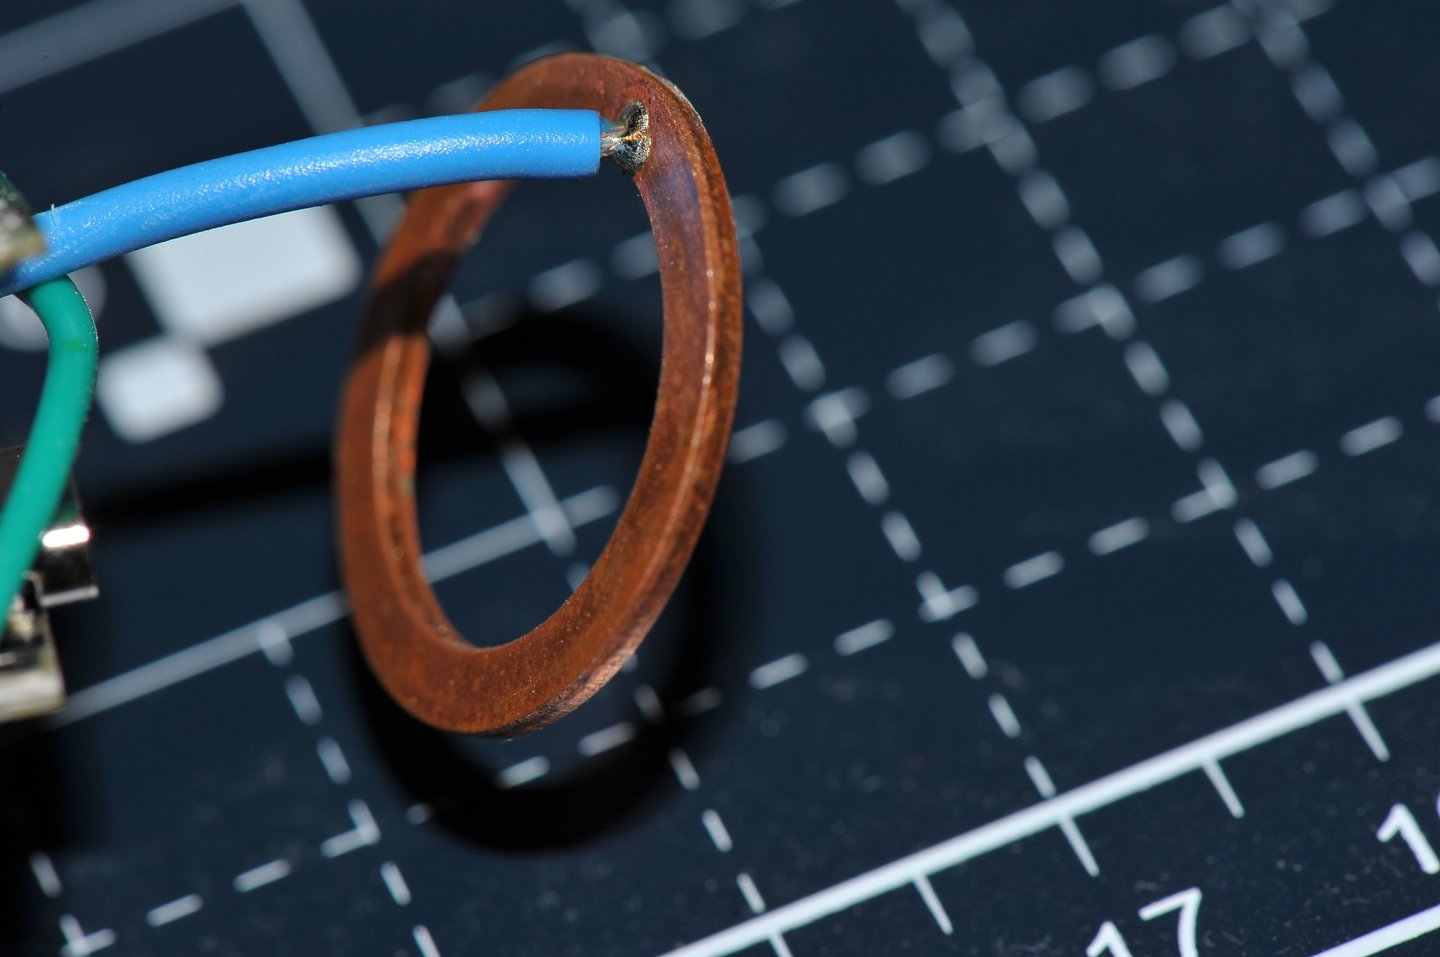
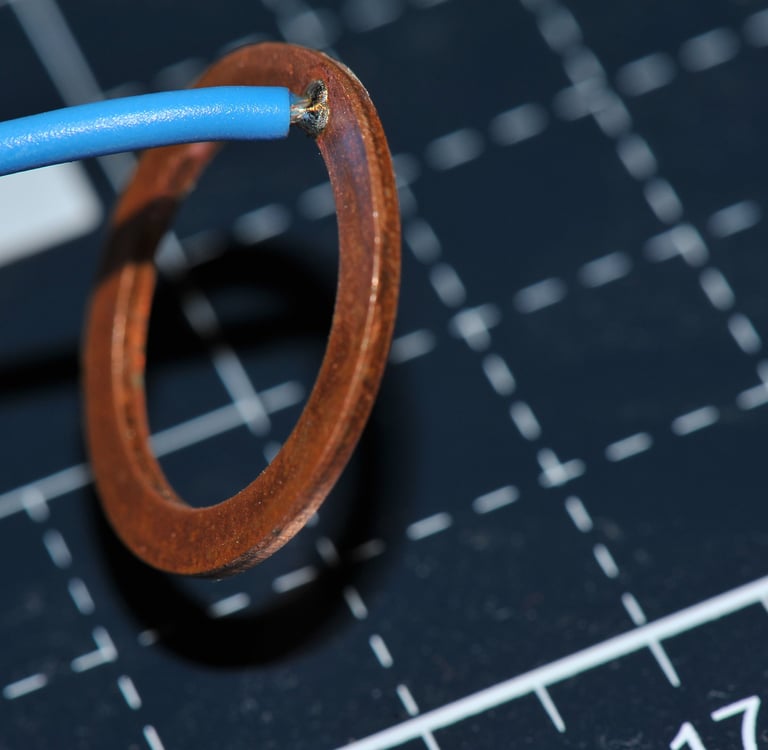
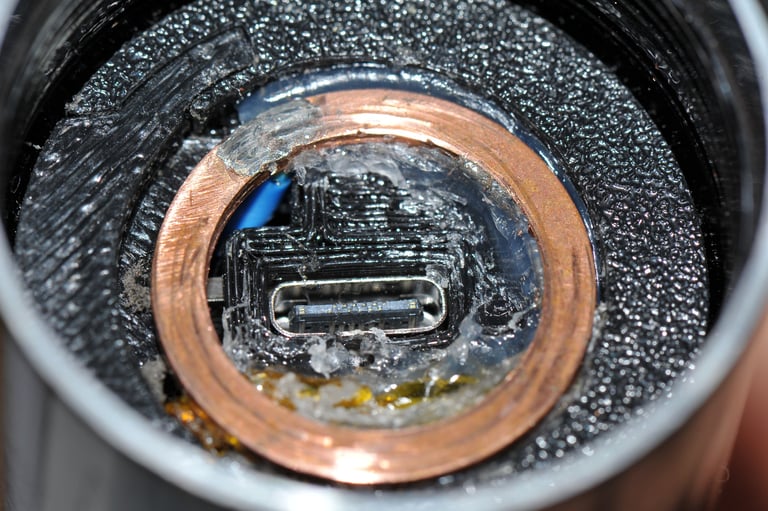
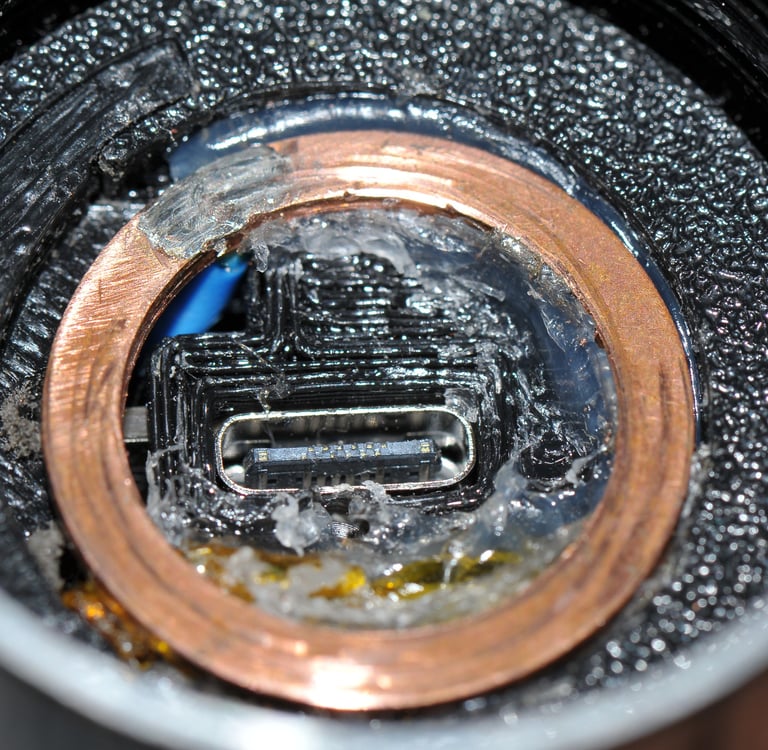
For the negative lead I used a copper seal (the same seal that keeps the engine oil from leaking out of a car engine) and drilled a tiny hole through it with the Dremel (that screaming tool that makes any macho-man feel like a dentist), through which I then fed the negative wire and soldered it.
When everything is put together (with hot glue), the USB-C port is in the middle of the seal so the batteries can be charged inside the Maglite.

One surprise I had after putting everything together was that the bulb simply would not turn on and that was quite a bummer I tell you!
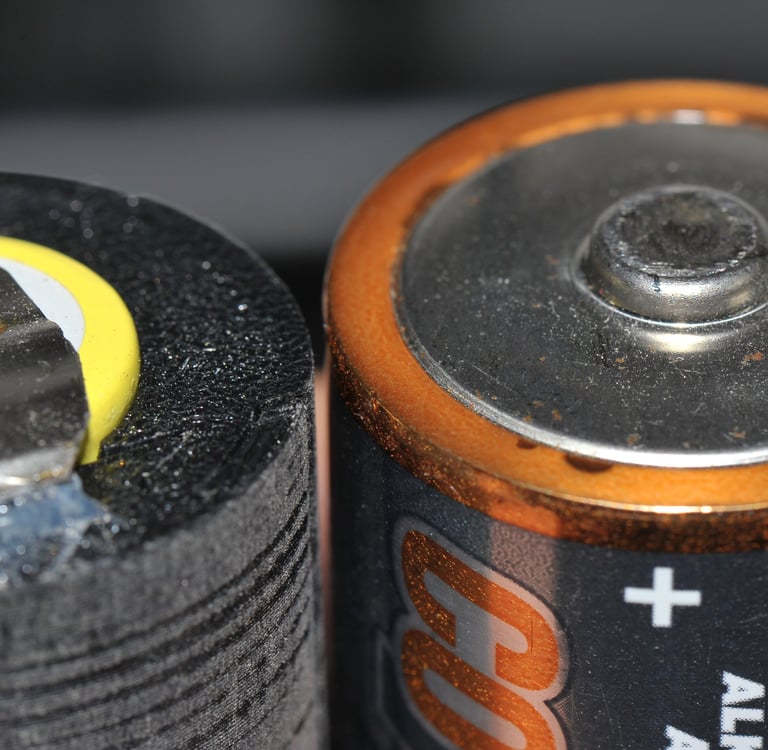
As you can see on the picture, D cells have a hump on the plus pole so I had to create a hump with solder on the plus pole of my 18650 too.
Again, I do not recommend you do this! Heating an 18650 with a soldering iron is a dangerous thing! The cell might catch fire or even explode! You at least should be wearing protection when doing this work, at least safety goggles and a full-face shield! If you heat the cells up too long (because your iron is weak or because you are on the oxide layer of the metal or because there is dirt or oil on the contacts) you will be getting into dangerous territory! It is always best for you to use a temperature-controlled iron and count to ten when doing the work and stop adding heat once you reached ten seconds. If you need ten seconds to solder on an 18650 you are doing something wrong and putting yourself in danger. If you need multiple iterations like I needed here it is always best to solder for max 10s, then let the Cell cool down completely for hours before attempting to solder again!
Performance: Incandescent vs LED
The question is always what do you expect. If you run a 7,2V non-Maglite incandescent bulb, like I am you cannot expect the same performance a 4,5V Maglite incandescent bulb has, that is just not going to be the case. Maglite Bulbs have their little magic in them that for sure increase their light output. But at least you woul run your Maglite on some really cheap bulbs for 84 cents a pop that on the down side only last between 10 and 30 hours each (the Bulb not the battery). On the other hand you can spend a bit more money one a quality LED that will last one can say almost forever. And that LED comes in with nice packaging too, giving it a really high-quality feel.
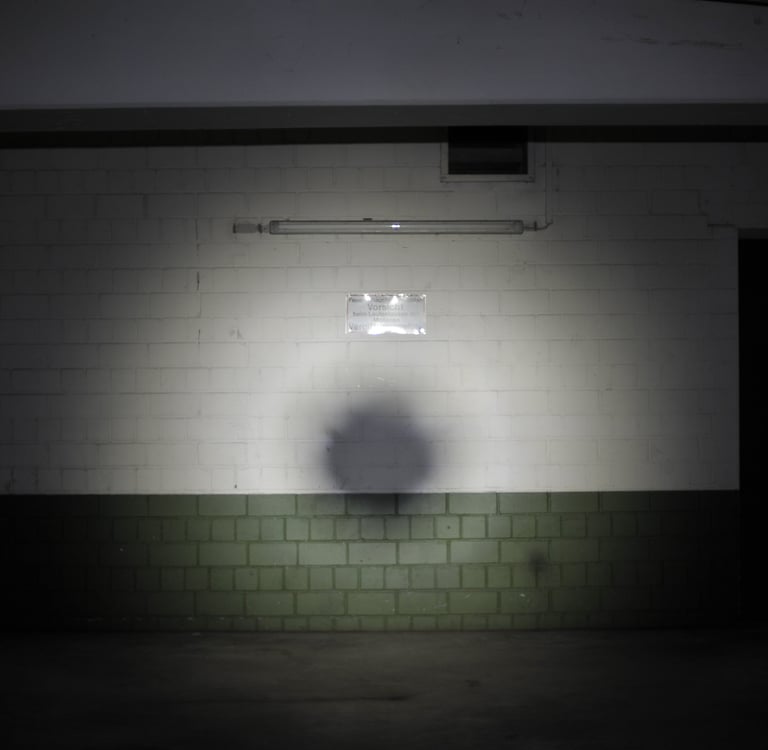
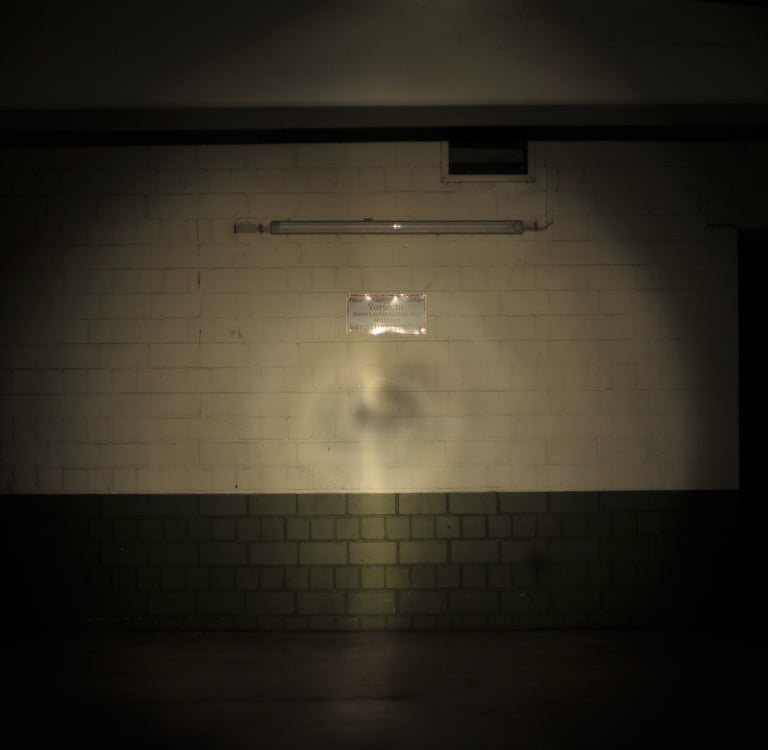
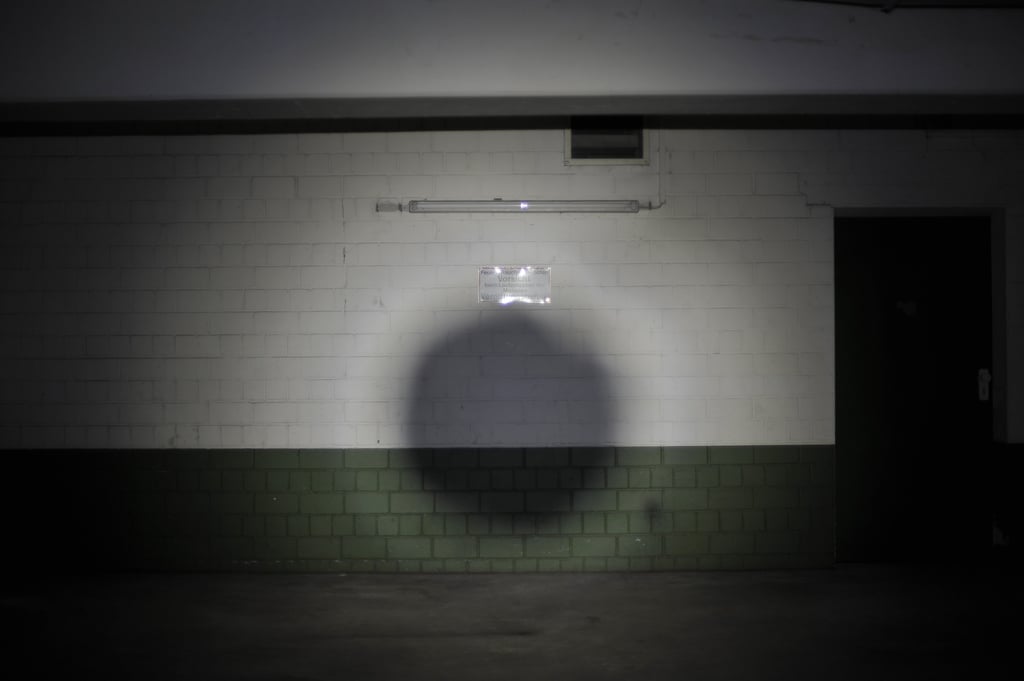
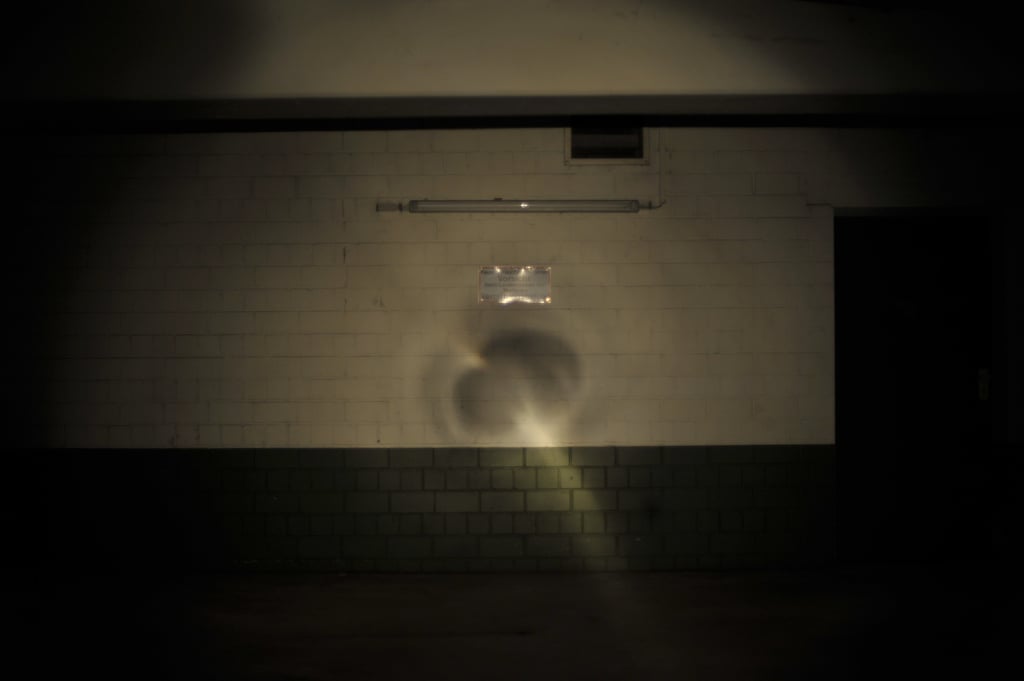
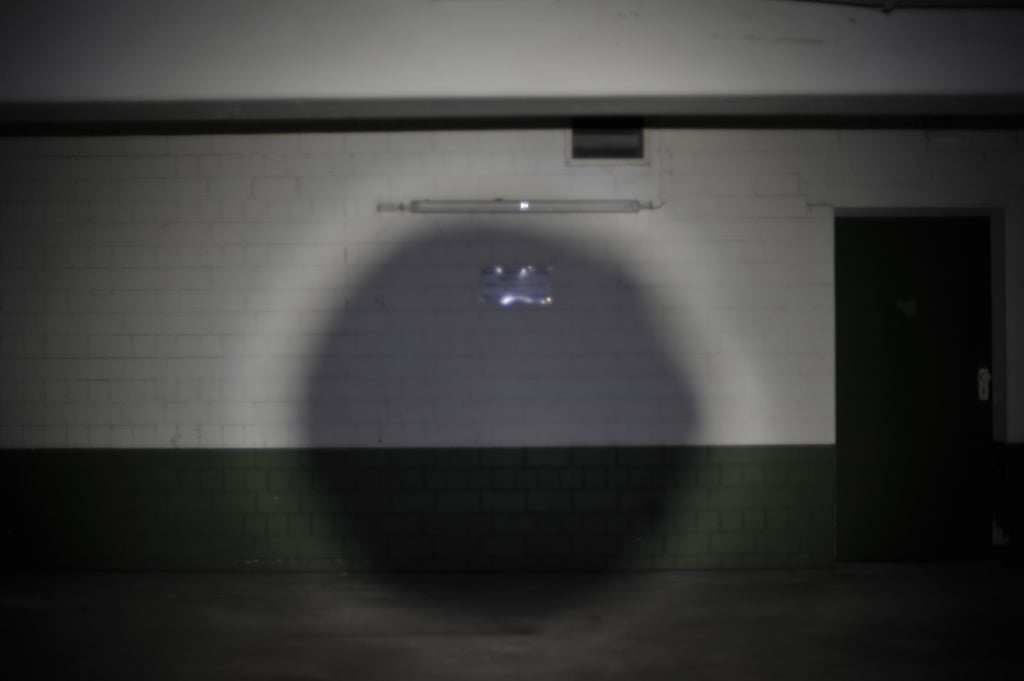
For this next part I tried to take similar pictures with a similar beam coming out of the torch with both LED and incandescent and keeping the same aperture and shutter speeds on the camera, to avoid the exposure compensation.
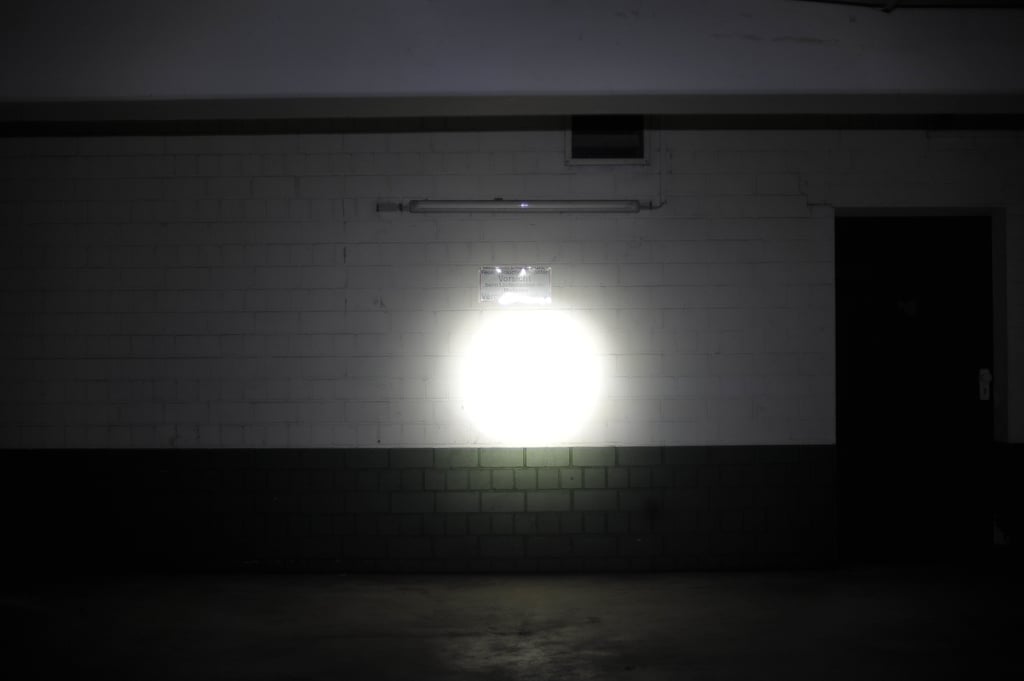
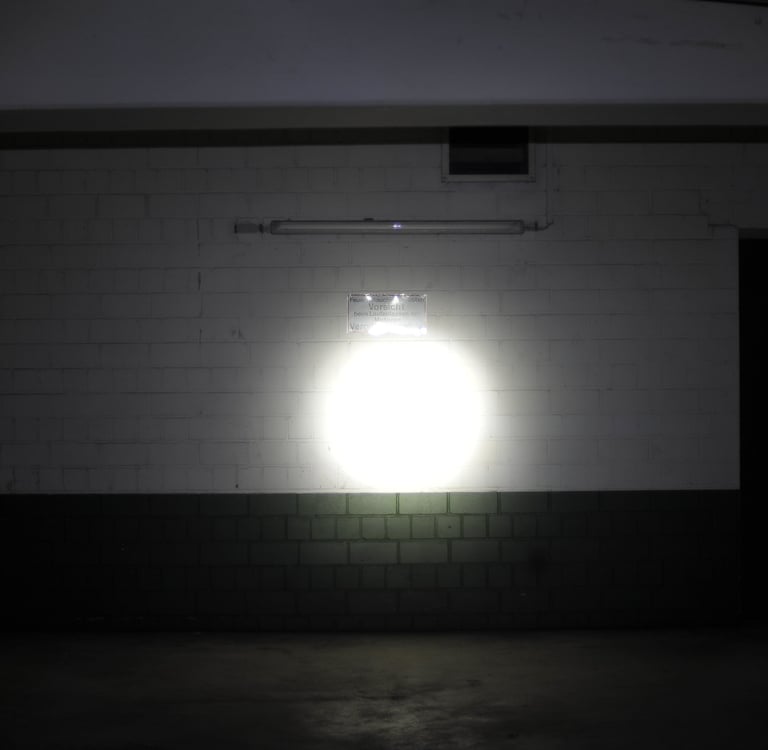
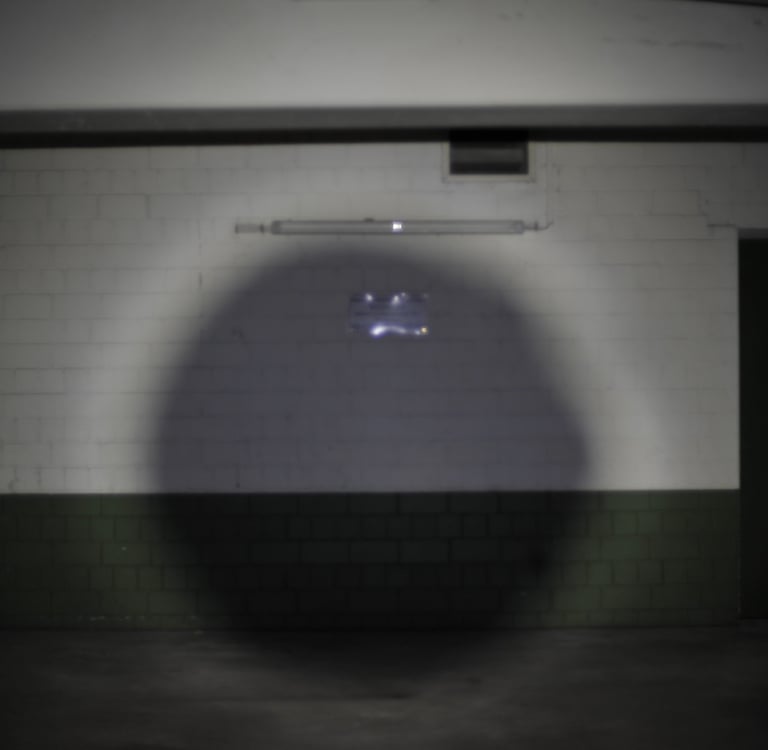
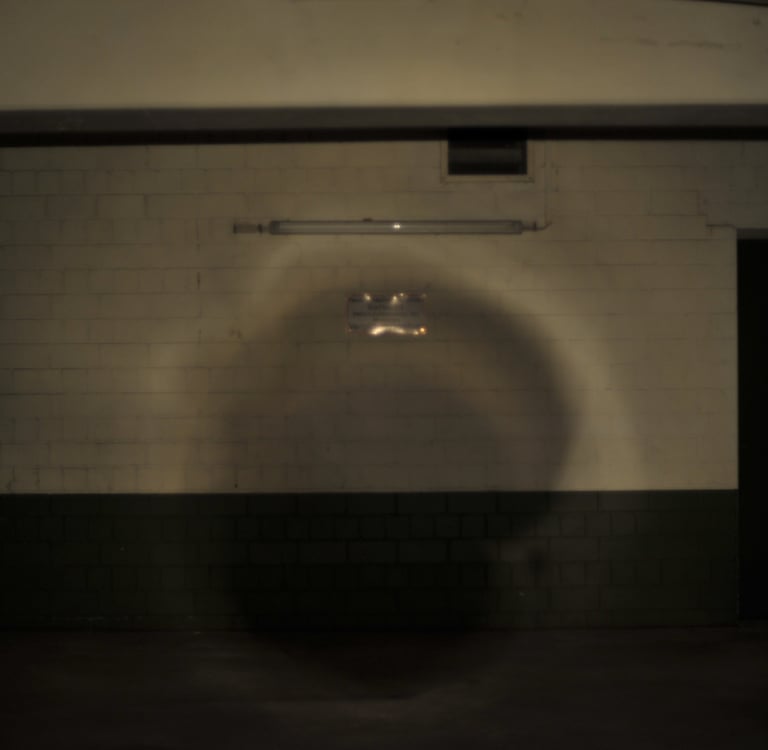
1/25 f/1.4 ISO 400 LED focuses on a bright tight spot
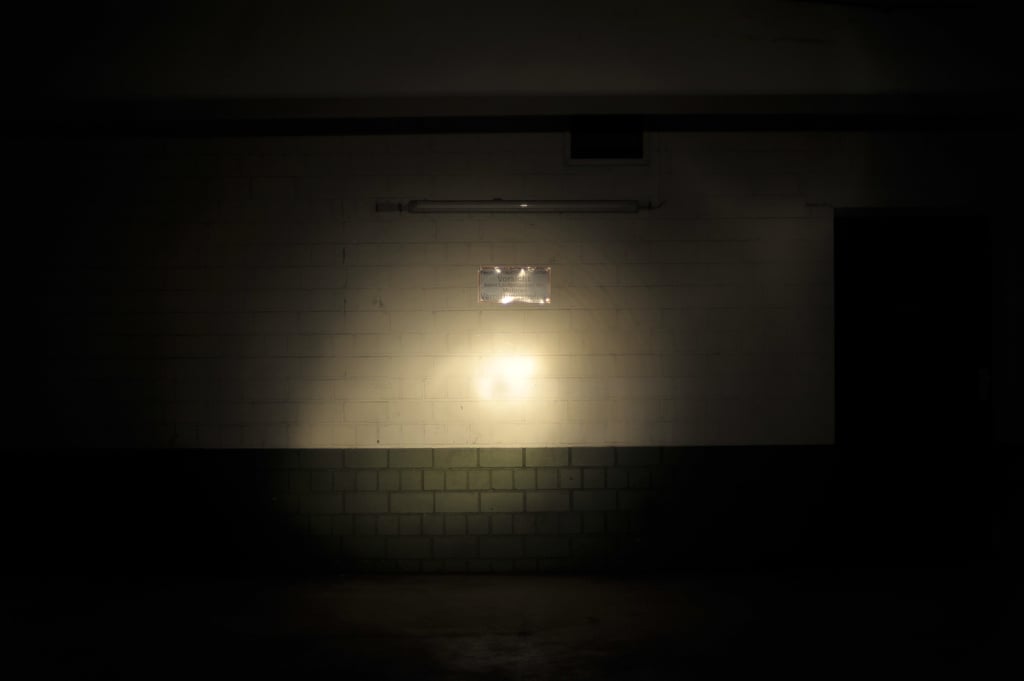
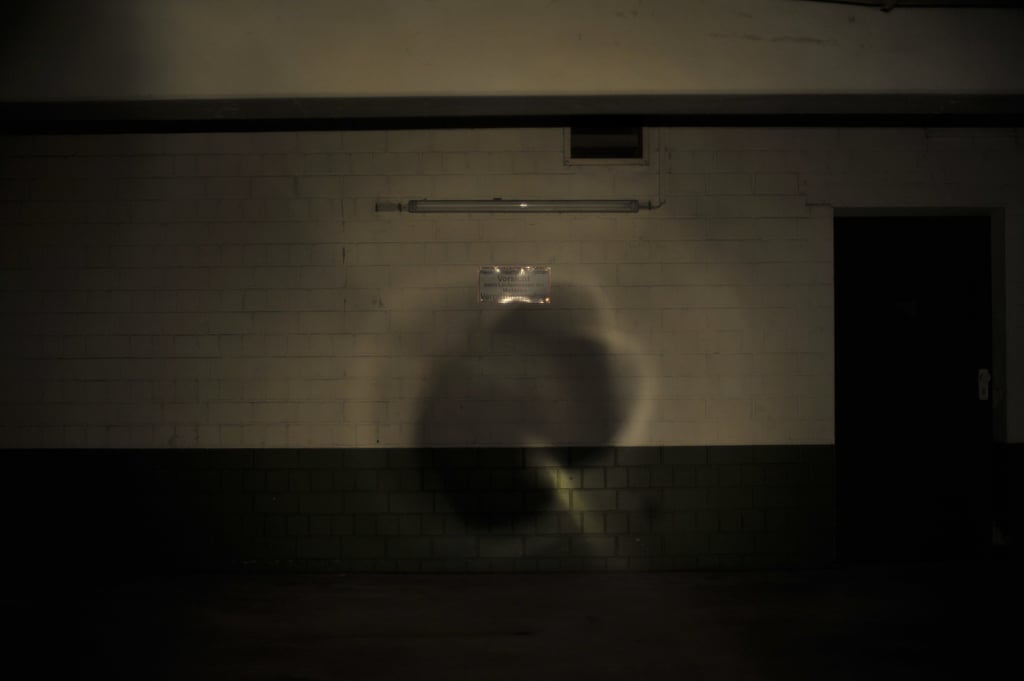
1/25 f/1.4 ISO 400 Incandescent cannot be focused as tight as the LED, but one gotta love that warm light...
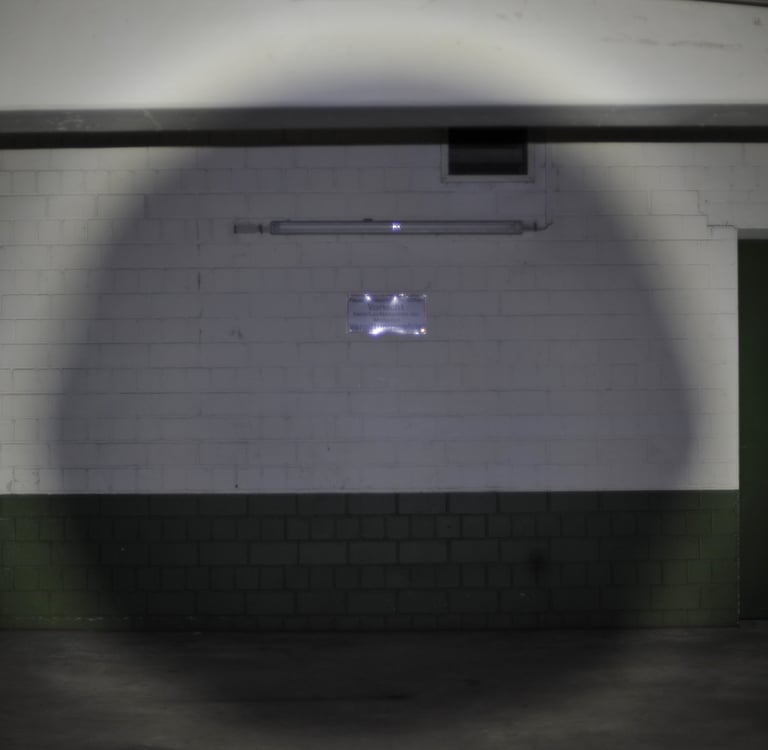
1/25 f/1.4 ISO 400 LED Observe how much more of the door on the right side of the frame is being shown
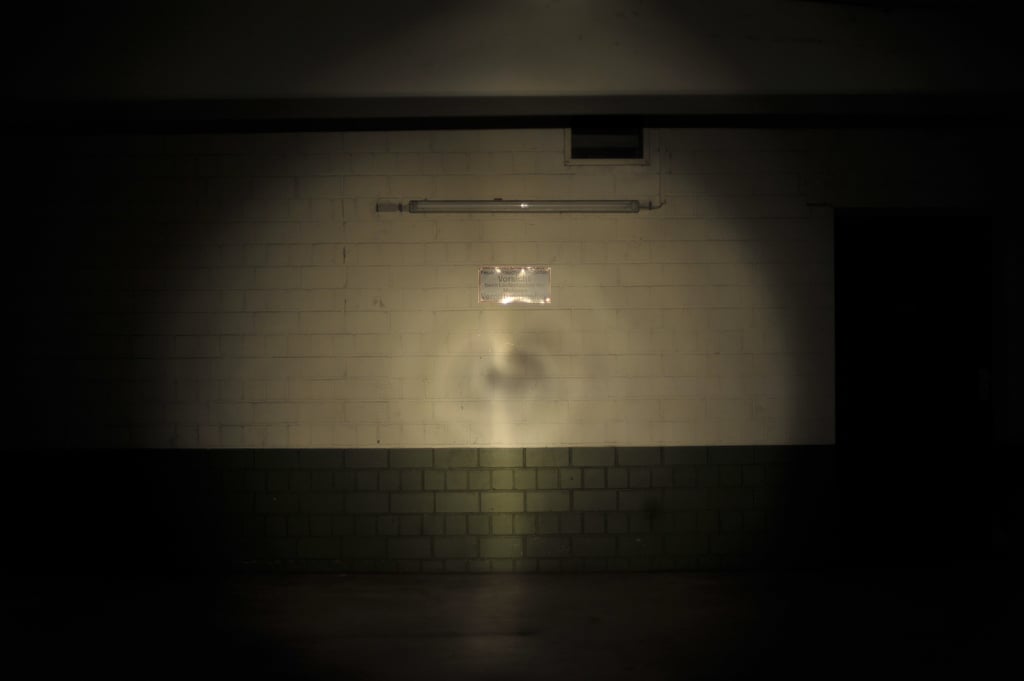
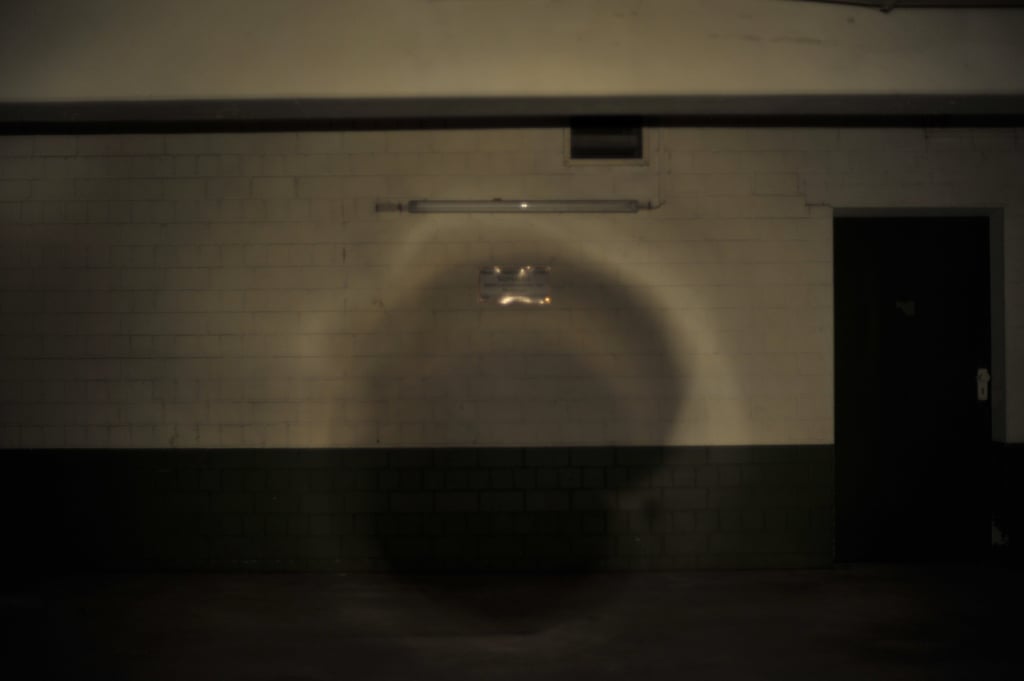
1/25 f/1.4 ISO 400 One gotta love that warm light though, right?
1/25 f/1.4 ISO 400 LED Is again much brighter
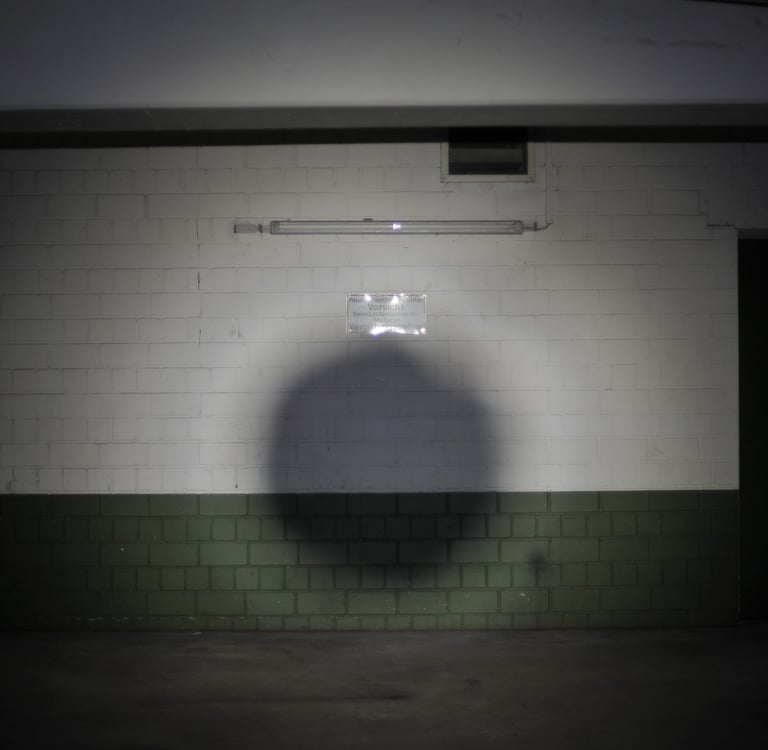
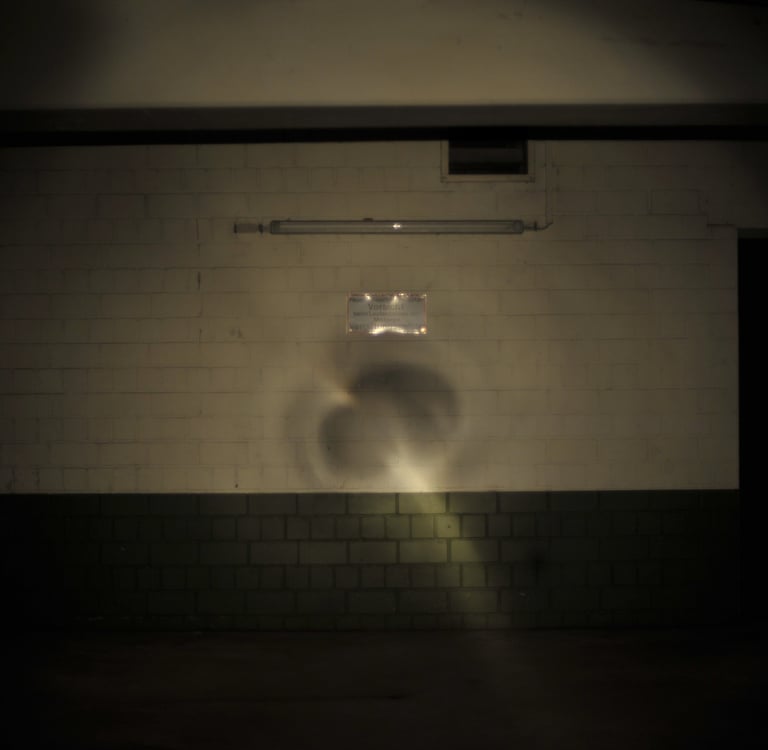
1/25 f/1.4 ISO 400 Much more romantic lights
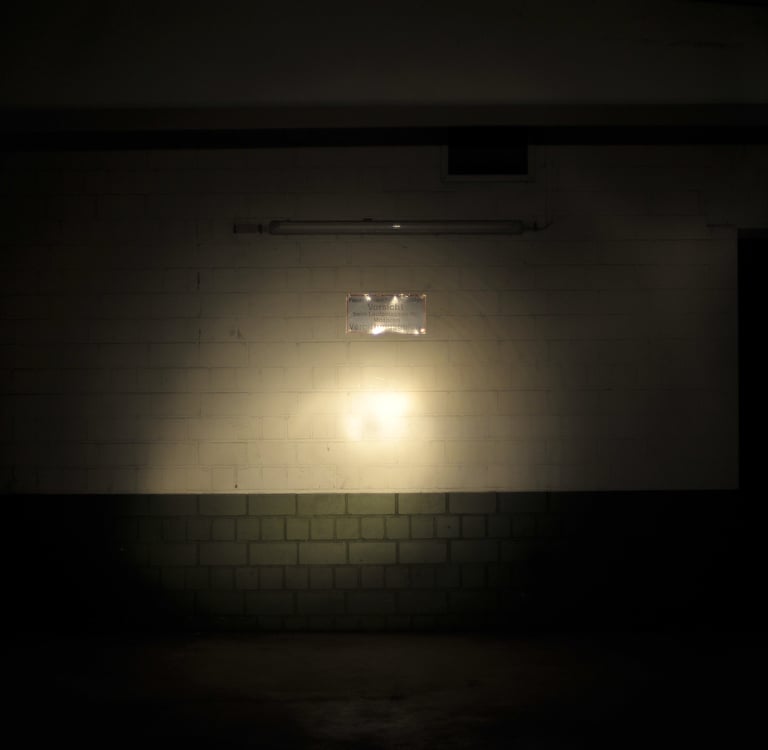
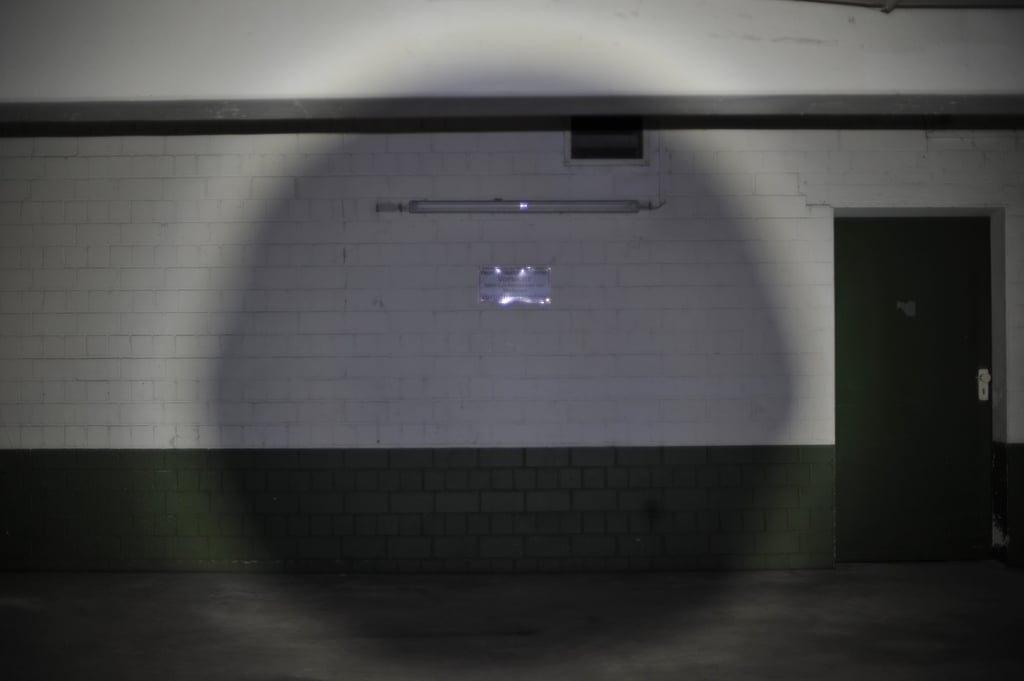
1/20 f/1.4 ISO 400 LED Forget about the focus I wasn't paying attention...
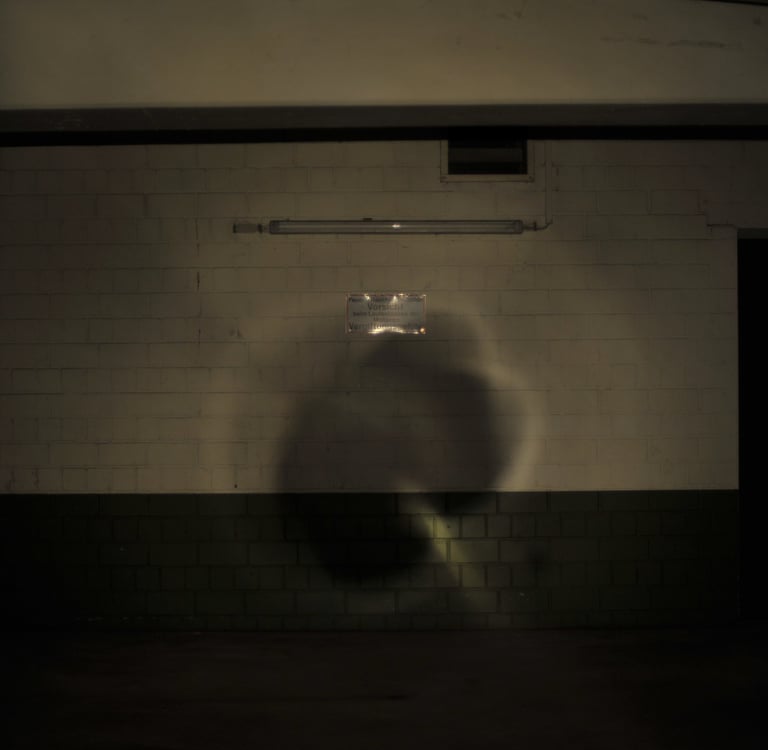
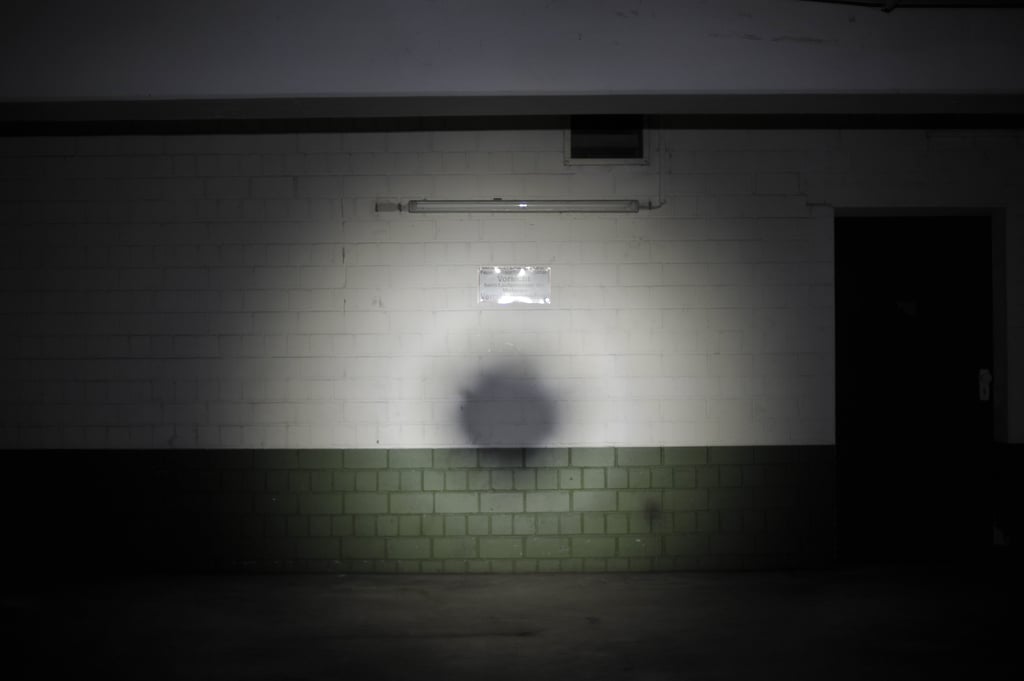
1/20 f/1.4 ISO 400 It's unfair. You're not just getting less light but also consuming almost double the power!
1/10 f/1.4 ISO 400 LED Consumes 305mA @ 8.29V
1/10 f/1.4 ISO 400 Consumes 513mA @ 8.29V
Power consumption: Incandescent vs LED
Considering you went for some 2000mAh 18650s that would mean you run times would be around 4-5 hours on the Incandescent Bulb and around 6.5 - 7 hours on the LED.
Running this with the LED is equivalent to driving a faster car that uses one-third less fuel.
However, people still choose to drive old-timers, muscle cars, VW beetles, two-stroke motorcycles (and cars), SUVs, pickup trucks, and other numerous kinds of vehicles that are totally unnecessary and abysmally inefficient.
So, there's no harm in keeping that incandescent bulb. I am more of a romantic person anyway and as such I love the warmth of an incandescent light!
Final thoughts: Not Practical, but fun!
Creating this adapter for a Maglite flashlight was an engaging project, but... I don’t recommend you do it. There are no clear benefits. It’s just as easy (and safer) to purchase three D cells, or three rechargeable NiMH D cells. The potential cost savings, if you already have some 18650s lying around don’t outweigh the potential risks or hassle of dealing with Lithium batteries.
Working with lithium-ion batteries is inherently dangerous and should be approached with extreme caution. Lithium-ion cells can be volatile, prone to overheating, and may even catch fire if mishandled, overcharged, or improperly stored. These risks far outweigh any minor convenience or cost savings you might hope to achieve. If you decide to experiment with lithium-ion batteries for this or any other project, it’s crucial to fully understand the risks and take all necessary safety precautions!
Ultimately, while this idea may seem intriguing or even fun to tinker with, it’s unnecessary and impractical. The same result can be achieved by simply buying three D cells for less money, hassle, and risk. This project serves more as an amusing concept than a practical solution.
That being said, it was fun all the way to the end and I still feel joy every time I use my flashlight! I would definitely do it again.
Thanks a lot for reading and I hope you learned something or simply enjoyed the experience!

Contact Me
If you are interested in nerding out about photography or want to see a bit more of my pictures, kindly leave a message in the form below. I'd also appreciate it if you let me know about any typos or errors you find on this website.
Subscribe
Or mail me at:
info@thiago-silva.com
If you are interested in ordering prints, calendars, or cards, or if you'd like to book me for product or event photography or photography workshops, kindly leave your contact along with your request. This way, we can discuss your needs in detail and ensure everything is tailored to your preferences. I'd also appreciate it if you let me know about any typos or errors you find.